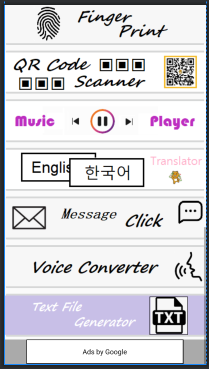
SuldenLion's Versatile App 3주차 개발 로그
추가 사항)
- Splash 기능
- lottie 라이브러리를 사용한 애니메이션 효과
- 상단바 알림 기능
- Text to voice 기능
- Text File 생성 기능
스토어 출시 관련해서는 앱 사용중 비정상 종료되는 요소들 때문에 출시 거부되는 이슈 발생
스토어 등록은 당장 중요하진 않으므로 신경쓰지 않도록 함
[Splash]
앱 실행시 바로 앱으로 들어가면 밋밋해 보이므로 짧은 시간 앱의 입장 화면을 보여주는 기능.
Thread로 4초간 화면을 보여줄 것임.
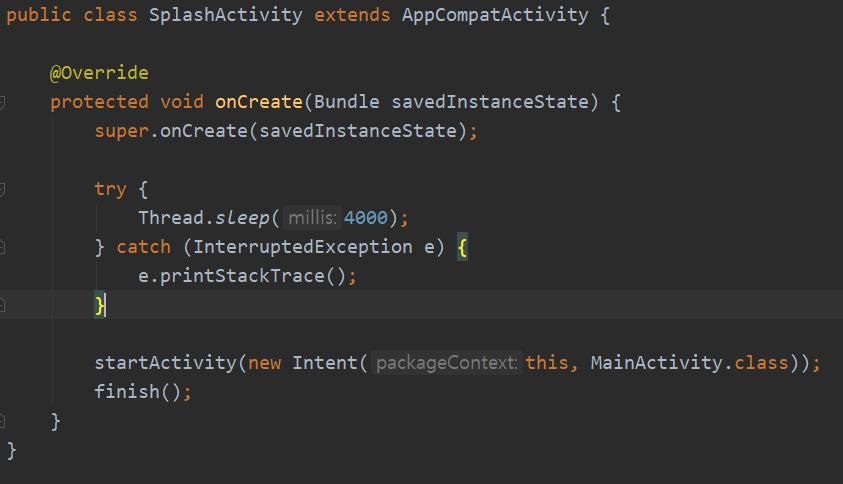
액티비티의 xml은 별도로 없으며 manifest와 themes.xml 에서 작업이 이루어짐.
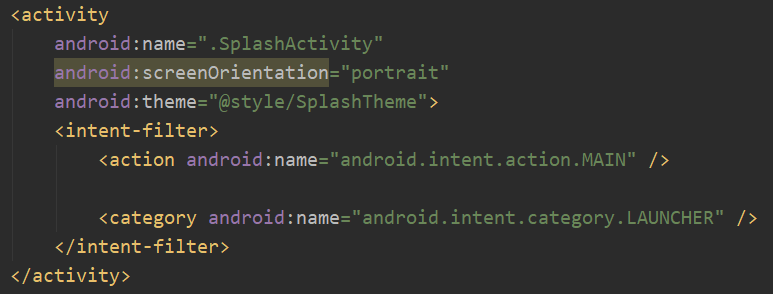

위와 같은 구성으로 동작.

앱 실행시 이 화면이 4초간 나오고 로그인 화면으로 이동.
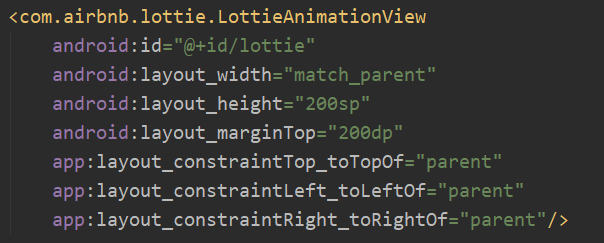
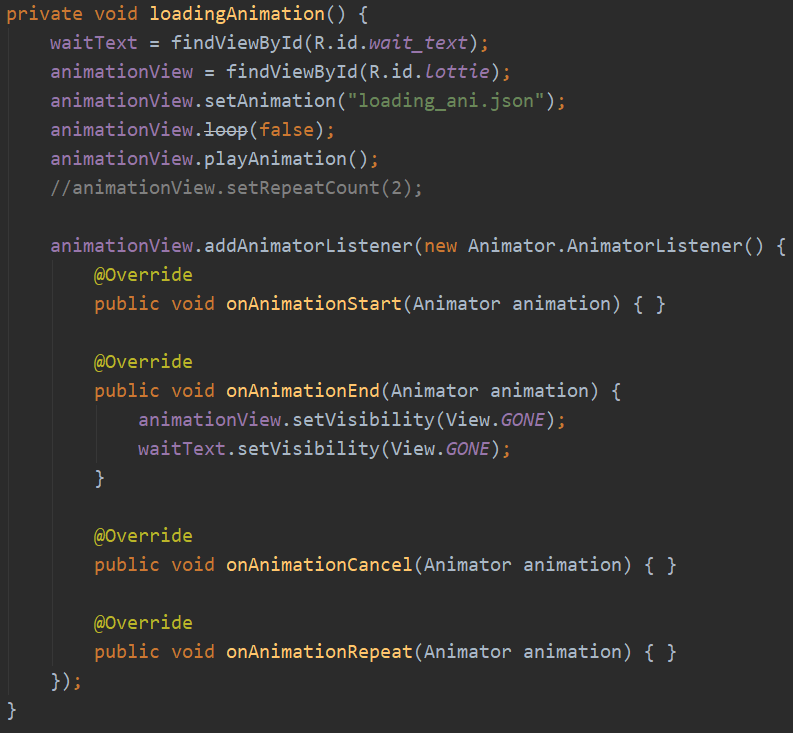
[Lottie]
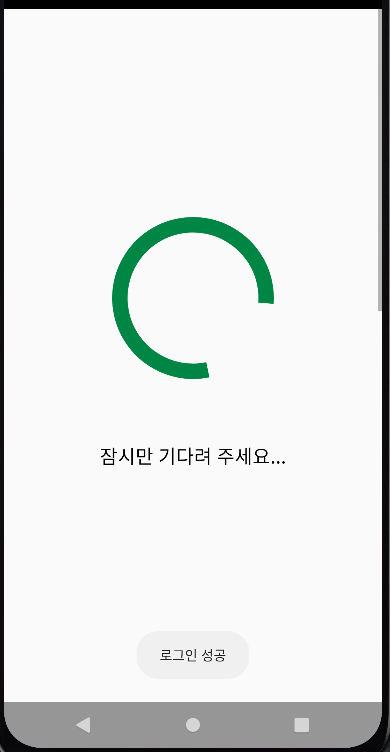
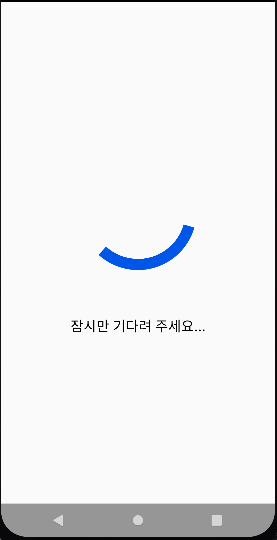
Airbnb에서 만든 lottie.
로그인 시 간단하게 기다려달라는 애니메이션을 추가.
사용을 위해서는 아래의 dependency 추가

메뉴화면 xml 파일에 lottie 컴포넌트 추가
java 파일에선 코드 몇줄만 적어주면 쉽게 사용
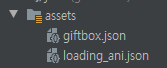
사용할 애니메이션은 아래 사이트에서 json 형식의 파일을 받아 사용한다.

받은 파일은 app 하위에 assets 폴더를 만들어 넣어준다.
사용이 어렵지 않음.
[Message Click]
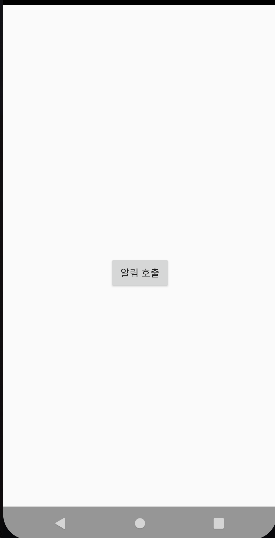
알림 호출 버튼을 눌러주면
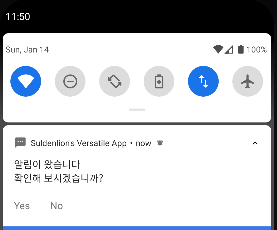
기기에 메시지를 띄우고 Yes와 No 와 같은 옵션을 줘서 각 응답에 맞게 반응하도록 구성.
Yes 클릭시 YesActivity를 하나 만들어주고
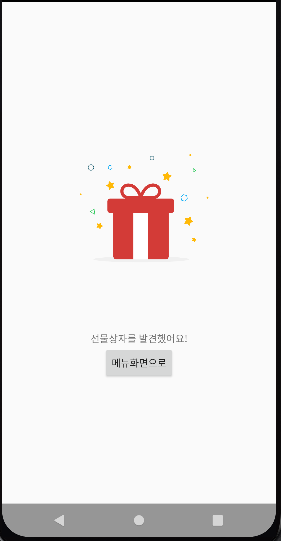
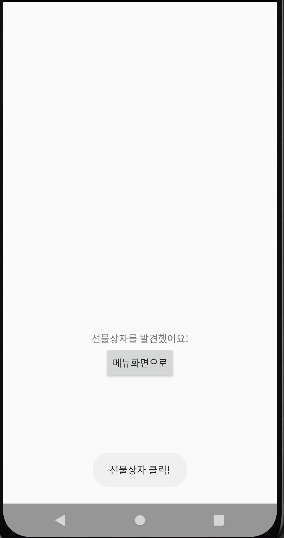
여기서도 lottie를 사용하여 움직이는 선물상자를 넣어줌.
상자 클릭시 이미지 날라가게 함. (클릭시 전면광고 표시 및 유저 보상 등으로 활용 가능할듯)
package suldenlion.tistory.com;

import androidx.appcompat.app.AppCompatActivity;
import androidx.core.app.NotificationCompat;
import androidx.core.app.NotificationManagerCompat;

import android.app.NotificationChannel;
import android.app.NotificationManager;
import android.app.PendingIntent;
import android.content.Intent;
import android.os.Build;
import android.os.Bundle;
import android.view.View;
import android.widget.Button;

public class NotificationActivity extends AppCompatActivity {
    public final String CHANNEL_ID = "my_notification_channel";
    public final int NOTIFICATION_ID = 101;

    @Override
    protected void onCreate(Bundle savedInstanceState) {
        super.onCreate(savedInstanceState);
        setContentView(R.layout.activity_notification);

        Button notificationBtn = findViewById(R.id.button);
        notificationBtn.setOnClickListener(new View.OnClickListener() {
            @Override
            public void onClick(View v) {
                displayNotification(v);
            }
        });
    }

    private void displayNotification(View v) {
        createNotificationChannel();

        //MenuActivity 설정
        Intent mainIntent = new Intent(this, MenuActivity.class);
        mainIntent.setFlags(Intent.FLAG_ACTIVITY_NEW_TASK|Intent.FLAG_ACTIVITY_CLEAR_TASK);
        PendingIntent MainPendingIntent = PendingIntent.getActivity(this , 0, mainIntent, PendingIntent.FLAG_ONE_SHOT);

        //YesActivity 설정
        Intent yesIntent = new Intent(this, NotificationYesActivity.class);
        yesIntent.setFlags(Intent.FLAG_ACTIVITY_NEW_TASK|Intent.FLAG_ACTIVITY_CLEAR_TASK);
        PendingIntent yesPendingIntent = PendingIntent.getActivity(this, 0, yesIntent, PendingIntent.FLAG_ONE_SHOT);

        //NoActivity 설정
        Intent noIntent = new Intent(this, NotificationNoActivity.class);
        noIntent.setFlags(Intent.FLAG_ACTIVITY_NEW_TASK|Intent.FLAG_ACTIVITY_CLEAR_TASK);
        PendingIntent noPendingIntent = PendingIntent.getActivity(this, 0, noIntent, PendingIntent.FLAG_ONE_SHOT);

        //알림설정
        NotificationCompat.Builder builder = new NotificationCompat.Builder(this, CHANNEL_ID);
        builder.setSmallIcon(R.drawable.ic_sms);
        builder.setContentTitle("알림이 왔습니다");
        builder.setContentText("확인해 보시겠습니까?");
        builder.setPriority(NotificationManagerCompat.IMPORTANCE_DEFAULT);
        builder.setAutoCancel(true);
        builder.setContentIntent(MainPendingIntent);
        builder.addAction(R.drawable.ic_sms, "Yes", yesPendingIntent);
        builder.addAction(R.drawable.ic_sms, "No", noPendingIntent);

        NotificationManagerCompat notificationManagerCompat = NotificationManagerCompat.from(this);
        notificationManagerCompat.notify(NOTIFICATION_ID, builder.build());
    }

    private void createNotificationChannel() {
        if(Build.VERSION.SDK_INT >= Build.VERSION_CODES.O){
            CharSequence name = "채널이름";
            String description = "채널설명";
            int importance = NotificationManager.IMPORTANCE_DEFAULT;

            //채널생성
            NotificationChannel notificationChannel = new NotificationChannel(CHANNEL_ID, name, importance);
            notificationChannel.setDescription(description);

            //알림매니저 생성
            NotificationManager notificationManager = (NotificationManager) getSystemService(NOTIFICATION_SERVICE);

            //알림매니저에 채널등록
            notificationManager.createNotificationChannel(notificationChannel);
        }
    }

}
알림 호출 화면.
채널 설정 및 각 Activity로 넘어가는 기능, 알림에 대한 기능 정의.
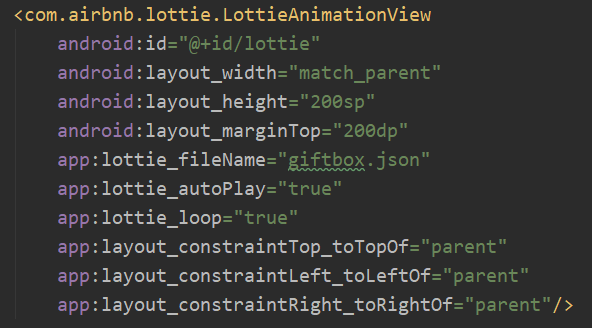
Yes 버튼 클릭시의 화면 중 로티 컴포넌트.
xml에서 파일 등록, 루프 설정 등이 가능함.
package suldenlion.tistory.com;

import androidx.appcompat.app.AppCompatActivity;

import android.app.NotificationManager;
import android.content.Intent;
import android.os.Bundle;
import android.view.View;
import android.widget.Button;
import android.widget.Toast;

import com.airbnb.lottie.LottieAnimationView;

public class NotificationYesActivity extends AppCompatActivity {
    private LottieAnimationView animationView;

    @Override
    protected void onCreate(Bundle savedInstanceState) {
        super.onCreate(savedInstanceState);
        setContentView(R.layout.activity_notification_yes);

        animationView = (LottieAnimationView)findViewById(R.id.lottie);
        animationView.setOnClickListener(new View.OnClickListener() {
            @Override
            public void onClick(View v) {
                animationView.setVisibility(View.GONE);
                Toast.makeText(NotificationYesActivity.this,"선물상자 클릭!",Toast.LENGTH_SHORT).show();
            }
        });

        NotificationManager notificationManager = (NotificationManager) getSystemService(NOTIFICATION_SERVICE);
        notificationManager.cancel(101);

        Button notificationBtn = findViewById(R.id.button);
        notificationBtn.setOnClickListener(new View.OnClickListener() {
            @Override
            public void onClick(View v) {
                Intent intent = new Intent(getApplicationContext(), MenuActivity.class);
                startActivity((intent));
            }
        });
    }
}
YesActivity
[Voice converter]
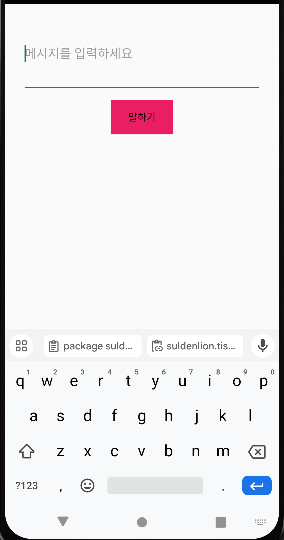
메시지 입력 후 버튼을 클릭하면 음성으로 읽어주는 프로그램.
package suldenlion.tistory.com;

import androidx.appcompat.app.AppCompatActivity;

import android.content.Intent;
import android.os.Bundle;
import android.speech.tts.TextToSpeech;
import android.view.View;
import android.widget.EditText;
import android.widget.Toast;

import java.util.Locale;

import javax.annotation.Nullable;

public class VoiceConverterActivity extends AppCompatActivity implements TextToSpeech.OnInitListener {

    public static final int TTS_ENGINE_REQUEST = 101;
    private TextToSpeech textToSpeech;
    private EditText textForSpeech;

    @Override
    protected void onCreate(Bundle savedInstanceState) {
        super.onCreate(savedInstanceState);
        setContentView(R.layout.activity_voice_converter);

        textForSpeech = findViewById(R.id.speech_text);
    }

    @Override
    public void onInit(int status) {
        if (status == TextToSpeech.SUCCESS) {
            int languageStatus = textToSpeech.setLanguage(Locale.KOREAN);

            if (languageStatus == TextToSpeech.LANG_MISSING_DATA || languageStatus == TextToSpeech.LANG_NOT_SUPPORTED) {
                Toast.makeText(this, "Unsupported language!", Toast.LENGTH_SHORT).show();
            } else {
                String data = textForSpeech.getText().toString();
                int speechStatus = textToSpeech.speak(data, TextToSpeech.QUEUE_FLUSH, null);

                if (speechStatus == TextToSpeech.ERROR) {
                    Toast.makeText(this, "Convert error!", Toast.LENGTH_SHORT).show();
                }
            }
        } else {
            Toast.makeText(this, "Convert engine error!", Toast.LENGTH_SHORT).show();
        }
    }

    // View를 인자로 받음으로 xml에서 선언한 onClick 사용가능
    public void textSpeech(View view) {
        Intent checkIntent = new Intent();
        checkIntent.setAction(TextToSpeech.Engine.ACTION_CHECK_TTS_DATA);
        startActivityForResult(checkIntent, TTS_ENGINE_REQUEST);
    }

    @Override
    protected void onActivityResult(int requestCode, int resultCode, @Nullable Intent data) {
        super.onActivityResult(requestCode, resultCode, data);

        if (requestCode == TTS_ENGINE_REQUEST && resultCode == TextToSpeech.Engine.CHECK_VOICE_DATA_PASS) {
            textToSpeech = new TextToSpeech(this, this);
        } else {
            Intent installIntent = new Intent();
            installIntent.setAction(TextToSpeech.Engine.ACTION_INSTALL_TTS_DATA);
            startActivity(installIntent);
        }
    }

}
TextToSpeech 인터페이스를 implements 받아서 사용
언어 설정을 한국어로 하고 에러 상황에 메시지를 띄워주게 함
textSpeech() 함수는 xml에서 onclick을 주어 선언함.
activityResult 함수에선 스피치를 위한 엔진이 안깔린 경우 설치, 조건 충족시 말하기 시행.
<?xml version="1.0" encoding="utf-8"?>
<LinearLayout xmlns:android="http://schemas.android.com/apk/res/android"
    xmlns:app="http://schemas.android.com/apk/res-auto"
    xmlns:tools="http://schemas.android.com/tools"
    android:layout_width="match_parent"
    android:layout_height="match_parent"
    android:orientation="vertical"
    tools:context=".VoiceConverterActivity">

    <EditText
        android:id="@+id/speech_text"
        android:layout_width="match_parent"
        android:layout_height="wrap_content"
        android:hint="메시지를 입력하세요"
        android:layout_marginLeft="25dp"
        android:layout_marginRight="25dp"
        android:layout_marginTop="55dp"
        android:lines="8"
        android:minLines="3"
        android:gravity="top|left"
        android:maxLength="100"
        android:padding="3dp"/>

    <Button
        android:layout_width="wrap_content"
        android:layout_height="wrap_content"
        android:text="말하기"
        android:layout_gravity="center_horizontal"
        android:layout_marginTop="10dp"
        android:background="#E91E63"
        android:onClick="textSpeech"
        />

</LinearLayout>
[Text file generator]
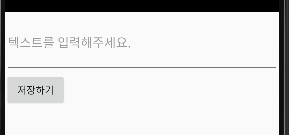
텍스트 입력후 저장하기 버튼을 누르면 외부 저장소에 txt 파일을 저장하는 프로그램
먼저 매니페스트에 권한 추가

package suldenlion.tistory.com;

import androidx.appcompat.app.AppCompatActivity;

import android.os.Bundle;
import android.os.Environment;
import android.view.View;
import android.widget.Button;
import android.widget.EditText;

import java.io.File;
import java.io.FileOutputStream;
import java.io.IOException;
import java.text.SimpleDateFormat;
import java.util.Date;

public class CreateTxtActivity extends AppCompatActivity {
    private final static String folderName = Environment.getExternalStoragePublicDirectory(Environment.DIRECTORY_DOWNLOADS).getAbsolutePath()+"/File";
    private String fileName = "file.txt";
    private EditText textBox;
    private Button btnSave;

    @Override
    protected void onCreate(Bundle savedInstanceState) {
        super.onCreate(savedInstanceState);
        setContentView(R.layout.activity_create_txt);

        textBox = findViewById(R.id.textbox);
        btnSave = findViewById(R.id.btn_save);

        btnSave.setOnClickListener(new View.OnClickListener() {
            @Override
            public void onClick(View v) {
                String now = new SimpleDateFormat("yyyy-mm-dd HH:mm:ss").format(new Date());

                String contents = "파일 내용 : " + textBox.getText().toString() + "\n 파일 작성 시간 : " + now + "\n";
                WriteTextFile(folderName, fileName, contents);
            }
        });
    }

    private void WriteTextFile(String folderName, String fileName, String contents) {
        try {
            File dir = new File(folderName);

            if (!dir.exists()) {
                dir.mkdir();
            }

            FileOutputStream fos = new FileOutputStream(folderName+"/"+fileName, true);
            fos.write(contents.getBytes());
            fos.close();
        } catch (IOException e) {
            e.printStackTrace();
        }
    }
}
저정할 폴더와 파일 이름을 지정 후, 저장하는 현재 시각을 지정해준다.
그리고 FileOutputStream을 이용하여 저장된 내용을 바이트 단위로 write하여 만드는 방식.
빠뜨린 내용이 있을 수 있음
일단 여기까지 정리
'App 소개' 카테고리의 다른 글
| [Kotlin] Gemini API를 사용한 AI Chat bot 앱 만들기 (0) | 2024.08.04 |
|---|---|
| 3D Paint App (0) | 2024.06.23 |
| 심심해서 만들어보는 앱 "SuldenLion's Versatile App" 개발로그_2 (0) | 2024.01.07 |
| 심심해서 만들어보는 앱 "SuldenLion's Versatile App" 개발로그_1 (0) | 2023.12.31 |
| SuldenLion Chatting (0) | 2022.05.16 |


댓글